Showing posts with label Hands and Feet. Show all posts

Monday, February 09, 2009

ADD SCULPEY TO THE HAND ARMATURE


Adding sculpey to the hand armature using this method makes modeling hands easy and fun. Keep in mind this is just one way of modeling hands. As you continue to make figure sculptures you will develop your own style and techniques.

To begin modeling the hand the armature must be prepared. Proportions must be considered. Generally the and is as large as the face. It is pretty nice to know that the thumb comes out between the wrist and the first knuckle of the index finger, that the middle finger is the straightest, and that the rest of the finger subtly curve toward the middle finger.

With these little proportion hints in mind use pliers to group, bend, and straighten the fingers and thumb, then trim the fingers so that the middle is the longest, the ring finger next longest, the index finger and then the little finger.

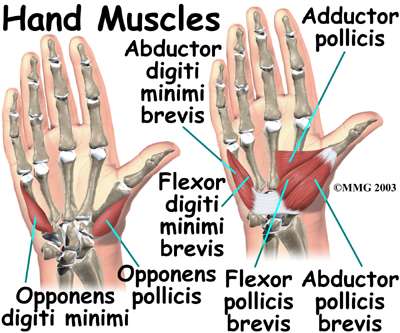
Next add the bulkiest areas of the hand. These muscles are in the palm of the hand. Look at the shape of the muscle of the thumb. It is shaped kind of like a tear drop with the pointed end towards the thumb.This is an Abductor Pollicis which is divided into three parts. Then add the heel of the hand along side of the little finger called the Abductor Digiti Minimi. Then the muscles at the base of the fingers which seems to be cartilage.

Turn now to the back of the hand. Roll out a slab and cut it into a kind of parallelogram. It will be smaller toward the wrist and larger towards the fingers.

At this point check to make sure that the index finger runs a straight line from the arm and that the little finger does the same thing. When the sculpey that represents the back of the hand is placed on the armature, make sure that the thumb comes out in the middle of this form. In other words CHECK THE PROPORTIONS.

Also it is good to remember that the hands are generally delicate so go light on the sculpey.

A whole other set of rules applies with sculpting exaggerations of the human figure. In that case, the sky is the limit. Maybe as the artist you want the hands to be huge or really long fingers it all depends upon the character you are trying to get across to the viewer.

Once the base of the hand is complete begin to add sculpey to the fingers. VERY TINY, THIN PIECES OF SCULPEY. A good thing to keep in mind is that fingers generally taper toward the end and get wider at the base. Apply a somewhat triangular shaped piece of sculpey to the fingers and wrap it gently around the wire armature. smooth and then do the same thing with the other fingers. Give yourself plenty of time.


HAND MUSCLES

FEET


It has been said that hands and feet are the hardest to draw and sculpt. However, this method can eliminate a lot of the hassle of making feet.

When beginning remember three things: 1) coils and spheres; 2) anatomy book; 3) proportion.

Set up the work space with a slab, coil and tools. Notice that the biggest bone of the foot is the Calcaneus bone. That is the heel. Make a sphere and push that onto the end of the back of the foot. Next build up the Talus, Navicular, Cunefiroms and Cuboid, bones. Make four or five spheres and place them across the top of the foot in an arch. Place them at the base of the tibia and fibula, or the base of the leg. Add the Lateral Ankle (the ankle on the outside of the foot) and the Medial Ankle (the inside ankle). Remember proportion - the Lateral ankle is lower than the Medial Ankle.

After those forms are in place think about proportion. How big is the foot compared to the body. The foot is about the same length as from the wrist to the elbow on the arm.

Now the decision on how long to make the toes can be made. Make Five coils theses represent the Metatarsals and Phalanges (the toes and the joints). The big toe also has a flexor muscle that goes over the top of the foot all the way to the patella ( the knee). Next is the index toe, then the middle, then the ring toe, then the pinky toe. Notice how the pinky toe curves a little.

Blend the little toe a bit. Then add and abductor muscle (it's the what most people call the ball of the foot) it goes along side of the big toe. From the abductor muscle to the little toe is the widest part of the foot.

Place and thin slab across the top of the foot this represents the Superior Extensor Retinaculum.

The Achilles Tendon should go on at this point. It is a large muscle that attaches at the bottom of the Calcaneus and all the way to the back of the knee.

Do not add a lot of bulk to your sculpey or the legs and feet will be gigantic. Add the toe nails by pushing the sculpey in where toe nail would go. You can be more detailed. This is just a method to get you started until you gain more experience and find your own techniques and style.

Pre bake this skeleton and muscles of the foot. Then add a very thin translucent layer of sculpey to cover everything. Feather the ends and smooth it out. The bones and muscles will show through a bit giving the appearance of a fabulous foot.

BONES OF THE FOOT
MUSCLES OF THE FOOT BACK VIEW
MUSCLES OF THE FOOT FRONT VIEW

Monday, February 02, 2009

Hand Armature


Preparing the armature for the hands by first tying off the wrists. Remember the wrists are usually even with the crotch. It is important to keep the proportions correct and symmetrical. If the drawings call for exaggerations then deviations will be made. Use a 28 gauge galvanized wire to tie off the wrists.

Next clip the loops. Be careful to avoid clipping across the loop. It is suggested to cut the loops at each end as shown in Figure Number Four. Spread each finger and straighten the tips of each with the pliers.

Once each wire for the fingers has been straightened use the 28 gauge galvanized wire to carefully wrap each finger. This will give the sculpey something to stick to. When wrapping begin at the base of the hand and wrap the wire as tightly as possible. Work out toward the end of the finger. At the end of the finger let out some wire and go back to the base of the next finger and wrap up toward the end of the next finger. (See Figure Number 8) These loose pieces of wire will be clipped later.

Do not worry about trimming the fingers until later.

When all the fingers have been wrapped cut the wire off and crimp the wire carefully with pliers.