 Kenneth
Wednesday, September 30, 2009
 Amanda Santiago
 Hector Campos
Monday, August 31, 2009


13th CENTURY MOVIE THEME STUDENT WORK

Kingdom of Heaven "Leper King" by Ellie

Robin Hood by Brenton

Robin Hood by Kenny

Monty Python "Black Knight" by Ethan
13TH CENTURY THEME MOVIE CHARACTERS

Hunchback of Notre Dame "Priest" by Heidi

Three Muskateers by Won

Alexander Nevsky by Andrew
Tuesday, August 04, 2009


Wednesday, June 10, 2009


Tuesday, June 09, 2009


Saturday, April 04, 2009
Cool Links That Are Sculpture Related
Thanks to some watchful students I have some pretty cool sites to check out.
ANATOMY SCULPTING PROCESS
PHILIPPE FARAUT
CAN'T GET ENOUGH DAVID SILVA
MORE DAVID SILVA
FLYING MONKEY
START TO FINISH SCULP TUTORIAL
GREAT SKIN/TEXTURE TUTORIAL
ANIMAL SCULPTURES
Cool Sculptures
Scarlet Star
Sculptor Corner
Michael Paulus
Pop Give
Another Michaels
Cartoon Character Skeletons
DAMON BARD
CS MOORE STUDIO
DAVID SILVA
ALEX HEINKE
SCOTT
ANATOMY SCULPTING PROCESS
PHILIPPE FARAUT
CAN'T GET ENOUGH DAVID SILVA
MORE DAVID SILVA
FLYING MONKEY
START TO FINISH SCULP TUTORIAL
GREAT SKIN/TEXTURE TUTORIAL
ANIMAL SCULPTURES
Cool Sculptures
Scarlet Star
Sculptor Corner
Michael Paulus
Pop Give
Another Michaels
Cartoon Character Skeletons
DAMON BARD
CS MOORE STUDIO
DAVID SILVA
ALEX HEINKE
SCOTT
Wednesday, March 11, 2009


Friday, March 06, 2009
All The Work on This Blogspot Is Licensed

sculpey class by charl anne brew is licensed under a Creative Commons Attribution-Noncommercial-No Derivative Works 3.0 Unported License.
TEXTURE
Adding texture to a sculpture is fun. These are a few, but by far, not all of the options with which to experiment.
Adding texture to a sculpture is part of the tertiary forms. The texture adds detail. Detail, done well, can make a sculpture come to life.


Another technique for adding fur texture. Use the Super Extruder to create small coils. Layer them starting at the bottom and working up. Smooth out the ends at the top to reduce bulkiness. Render out the coils with the wood/wire loop tool. Remember to add a thin coat of vaseline to prevent "sculpey boogers".

Try adding scales. Two ways to build scales is to:
1) build up scales by creating individual plates. Go back into the plates and render them rounding them, blending them and sculpting them to appear as real as possible.
2) build them up by rows beginning at the bottom and working up. Make sure to have references. Having references will reveal the nature of the progression of scales in terms of size, transition, and shape. Depending upon the creature being created.

Some sculptures require wrinkles. The following images demonstrate one or two ways to approach this type of texture.
Extrude some coils and lay them on the area that requires wrinkles. Pre bake the coils. Using the Pasta Machine roll out a Number 1 or 2 level slab. That will be a very thin slab. Beginning at the bottom and allowing gravity to work with the application cover the coils. Render the surface allowing the coils to create wrinkles or folds.
Another way is to roll out a thin slab. Apply it in the same way only skip the coils. This method can be used for skin or clothes.
Remember to leave plenty of time to experiment and find methods unique to your sculpting styles.
Adding texture to a sculpture is part of the tertiary forms. The texture adds detail. Detail, done well, can make a sculpture come to life.


Another technique for adding fur texture. Use the Super Extruder to create small coils. Layer them starting at the bottom and working up. Smooth out the ends at the top to reduce bulkiness. Render out the coils with the wood/wire loop tool. Remember to add a thin coat of vaseline to prevent "sculpey boogers".

Try adding scales. Two ways to build scales is to:
1) build up scales by creating individual plates. Go back into the plates and render them rounding them, blending them and sculpting them to appear as real as possible.
2) build them up by rows beginning at the bottom and working up. Make sure to have references. Having references will reveal the nature of the progression of scales in terms of size, transition, and shape. Depending upon the creature being created.

Some sculptures require wrinkles. The following images demonstrate one or two ways to approach this type of texture.
Extrude some coils and lay them on the area that requires wrinkles. Pre bake the coils. Using the Pasta Machine roll out a Number 1 or 2 level slab. That will be a very thin slab. Beginning at the bottom and allowing gravity to work with the application cover the coils. Render the surface allowing the coils to create wrinkles or folds.
Another way is to roll out a thin slab. Apply it in the same way only skip the coils. This method can be used for skin or clothes.
Remember to leave plenty of time to experiment and find methods unique to your sculpting styles.
Tuesday, February 17, 2009
Quadruped Armatures

The next project is a "Quadruped", a four legged creature. To make an armature for the quadruped begin with an armature map. It is important to continue to include this step in the sculpture making process because it is where the proportions and scale of the sculpture are "Mapped" out.
Since the quadruped has four legs the torso (use 11 gauge wire) needs to have a "shoulder" at each end as shown in the picture (top center). Make two and use the first one to measure the second one so that they are both the same size. Remember symmetry is important. Bind the two pieces together. Use 16 gauge wire to wrap in neat coils between the pelvic area and the chest area of the armature (refer to the armature map to figure out where the pelvic area and apex (chest area) of the sculpture will be.
Separate the the ends of the torso as shown in the picture to create a scapula and pelvis.
Once the torso has been completed make the legs. Depending upon the sculpture it may make sense to use 11 gauge wire for the legs. For example if the animal has a lot of weight in the torso and needs extra strength to hold it up. Otherwise use 16 gauge wire to make the legs.
Make two sets of "arms" - remember from the anatomy armature? Use the armature map to make sure that the legs are the correct length and the same length.
Now that the loops are complete place one end into the "chuck" of the drill and twirl it into a "cord" as shown in the picture (second row right). Find the center of each and mark with a piece of tape. Straighten each piece. Take one set of legs and center over one end of the torso and wrap with 16 gauge wire to attach it to the torso.
With the legs attached to the torso the armature is ready for the head and tail.
The head is attached to the torso the same way as the anatomy sculpture. Make a brain cavity and attach the stem of the 11 gauge wire to the under part of the torso by wrapping with 16 gauge wire in a neat coil.
The tail is attached the same way only to the top.
Now it is appropriate to pose the armature according to the sketches or turnarounds.
Remember when posing the creature to give the spine curvature and bend the legs appropriately for the animal skeleton. Remember to create a pelvic area and a shoulder area just like on the anatomy armature. The differences are that on the quadruped the pelvis faces back. The scapula (shoulder bones) face forward. Refer to the pictures at the bottom left.
Brewly-d-Wolf


Brewly-d-wolf by CABrew is licensed under a Creative Commons Attribution-Noncommercial-No Derivative Works 3.0 United States License.
Monday, February 09, 2009
ADD SCULPEY TO THE HAND ARMATURE

Adding sculpey to the hand armature using this method makes modeling hands easy and fun. Keep in mind this is just one way of modeling hands. As you continue to make figure sculptures you will develop your own style and techniques.
To begin modeling the hand the armature must be prepared. Proportions must be considered. Generally the and is as large as the face. It is pretty nice to know that the thumb comes out between the wrist and the first knuckle of the index finger, that the middle finger is the straightest, and that the rest of the finger subtly curve toward the middle finger.
With these little proportion hints in mind use pliers to group, bend, and straighten the fingers and thumb, then trim the fingers so that the middle is the longest, the ring finger next longest, the index finger and then the little finger.
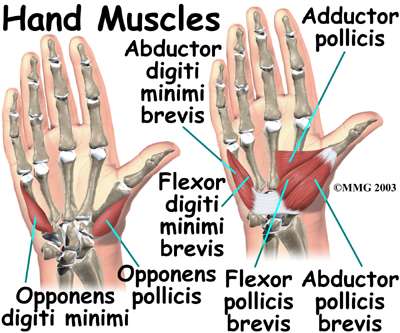
Next add the bulkiest areas of the hand. These muscles are in the palm of the hand. Look at the shape of the muscle of the thumb. It is shaped kind of like a tear drop with the pointed end towards the thumb.This is an Abductor Pollicis which is divided into three parts. Then add the heel of the hand along side of the little finger called the Abductor Digiti Minimi. Then the muscles at the base of the fingers which seems to be cartilage.
Turn now to the back of the hand. Roll out a slab and cut it into a kind of parallelogram. It will be smaller toward the wrist and larger towards the fingers.
At this point check to make sure that the index finger runs a straight line from the arm and that the little finger does the same thing. When the sculpey that represents the back of the hand is placed on the armature, make sure that the thumb comes out in the middle of this form. In other words CHECK THE PROPORTIONS.
Also it is good to remember that the hands are generally delicate so go light on the sculpey.
A whole other set of rules applies with sculpting exaggerations of the human figure. In that case, the sky is the limit. Maybe as the artist you want the hands to be huge or really long fingers it all depends upon the character you are trying to get across to the viewer.
Once the base of the hand is complete begin to add sculpey to the fingers. VERY TINY, THIN PIECES OF SCULPEY. A good thing to keep in mind is that fingers generally taper toward the end and get wider at the base. Apply a somewhat triangular shaped piece of sculpey to the fingers and wrap it gently around the wire armature. smooth and then do the same thing with the other fingers. Give yourself plenty of time.
HAND MUSCLES
FEET

It has been said that hands and feet are the hardest to draw and sculpt. However, this method can eliminate a lot of the hassle of making feet.
When beginning remember three things: 1) coils and spheres; 2) anatomy book; 3) proportion.
Set up the work space with a slab, coil and tools. Notice that the biggest bone of the foot is the Calcaneus bone. That is the heel. Make a sphere and push that onto the end of the back of the foot. Next build up the Talus, Navicular, Cunefiroms and Cuboid, bones. Make four or five spheres and place them across the top of the foot in an arch. Place them at the base of the tibia and fibula, or the base of the leg. Add the Lateral Ankle (the ankle on the outside of the foot) and the Medial Ankle (the inside ankle). Remember proportion - the Lateral ankle is lower than the Medial Ankle.
After those forms are in place think about proportion. How big is the foot compared to the body. The foot is about the same length as from the wrist to the elbow on the arm.
Now the decision on how long to make the toes can be made. Make Five coils theses represent the Metatarsals and Phalanges (the toes and the joints). The big toe also has a flexor muscle that goes over the top of the foot all the way to the patella ( the knee). Next is the index toe, then the middle, then the ring toe, then the pinky toe. Notice how the pinky toe curves a little.
Blend the little toe a bit. Then add and abductor muscle (it's the what most people call the ball of the foot) it goes along side of the big toe. From the abductor muscle to the little toe is the widest part of the foot.
Place and thin slab across the top of the foot this represents the Superior Extensor Retinaculum.
The Achilles Tendon should go on at this point. It is a large muscle that attaches at the bottom of the Calcaneus and all the way to the back of the knee.
Do not add a lot of bulk to your sculpey or the legs and feet will be gigantic. Add the toe nails by pushing the sculpey in where toe nail would go. You can be more detailed. This is just a method to get you started until you gain more experience and find your own techniques and style.
Pre bake this skeleton and muscles of the foot. Then add a very thin translucent layer of sculpey to cover everything. Feather the ends and smooth it out. The bones and muscles will show through a bit giving the appearance of a fabulous foot.
BONES OF THE FOOT
MUSCLES OF THE FOOT BACK VIEW
MUSCLES OF THE FOOT FRONT VIEW
Tuesday, February 03, 2009



Pre Primary Forms for The Anatomical Sculpture

The armature for the anatomical sculpture is now complete. The fun part of the process is about to begin - creating the character.
Use the drawings, sketches or turn arounds as a reference, as well as any other images to determine the overall basic form of the character. Use aluminum foil to build up the areas that have the more mass and volume.
It is preferable to bunch up the foil rather than fold it into flat pieces. Push and twist the foil onto the armature. Make sure it is tight and smooth. (No amount of sculpey can cover dents or mistakes in the armature or pre primary forms). Avoid adding a lot of foil to the arms and legs. To make the twisted wire smooth put a single layer of foil on the arms and twist tightly. For the legs build up areas, with foil, where there is greater mass and volume. For example, the thighs and calves. It depends on the build of the character.
The head should be added to last because the body proportions will determine the size of the head. Resist adding too much foil to the head because it will be mostly sculpey.
Once the foil has reached the desired contours and forms set up the workspace for sculpey. Begin adding the primary forms, the bones, for example the spine, ribs, clavical, pelvis, fibula, scapula and petella.
There is a skeletal chart posted to the blog for reference.
Subscribe to:
Posts (Atom)